Transforming Ordinary Photos into Dynamic Art with Water Splash Photoshop Actions
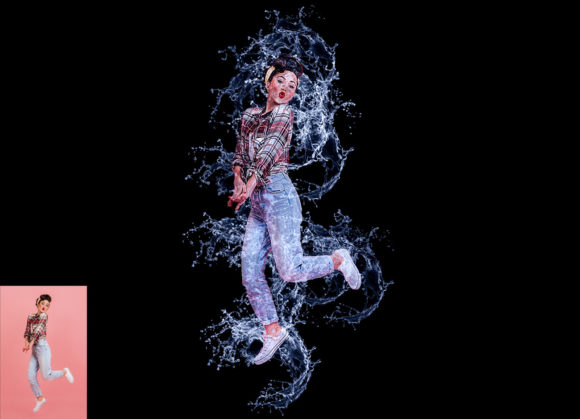
In the digital age, visual storytelling has become paramount. Whether you are a professional photographer, a graphic designer, or a social media enthusiast, the ability to manipulate images creatively is a valuable skill. One of the most striking effects in modern photo editing is the Water Splash Photoshop Action. This tool allows users to transform static, ordinary photographs into extraordinary, dynamic scenes featuring realistic water splashes. By understanding how this technology works and how to apply it effectively, you can elevate your creative portfolio significantly.
Understanding the Power of Non-Destructive Editing
Before diving into the specific mechanics of the action, it is essential to understand why non-destructive editing is crucial for professional workflows. A non-destructive effect means that the original image data remains untouched. Instead of permanently altering pixels, the software applies adjustments on separate layers. This approach offers unparalleled flexibility. If you decide later that the splash was too large or the color was incorrect, you can simply adjust or delete the layer without harming the base photograph.
The Water Splash Photoshop Action is designed with this principle at its core. It ensures that your creative process remains fluid and reversible. This is particularly important for beginners who may feel intimidated by complex editing software. Knowing that every step can be undone encourages experimentation and learning.
Why Choose a Pre-Made Action?
Creating a realistic water splash from scratch requires advanced knowledge of lighting, refraction, and particle dynamics. It can take hours to achieve a natural look. However, using a professional pack simplifies this process dramatically. With this action, you can turn your ordinary photos into high-quality results in minutes. The action handles the complex calculations of light and shadow, allowing you to focus on composition and creativity.
Key Features and Customization Options
One of the standout features of this specific action pack is its versatility. While many actions offer a single, rigid effect, this tool provides extensive customization options to suit various artistic visions.
- Ten Different Color Options: Water is not always blue. Depending on the lighting and environment, water can reflect greens, purples, or even warm sunset tones. This action includes ten different color options that you can access easily. When you open the "unviewed eye" (the visibility toggle) in the layers panel, you can switch between these presets instantly.
- Easy Color Changes: You can change the color very easily without needing to understand complex color theory. The action is structured so that hue and saturation adjustments are pre-linked, ensuring consistent results.
- High-Quality Results: Designed for professional use, the action generates sharp, high-resolution splashes that maintain clarity even when viewed up close.
- Organized Layers: The output is not a flattened image. Instead, you receive an organized layer structure. This allows you to tweak individual elements of the splash, such as opacity or blending modes, for a truly bespoke look.
Compatibility and Technical Requirements
To ensure smooth performance, it is vital to use software that supports the action’s scripting capabilities. This action has been rigorously tested and is confirmed to work on Photoshop English versions CC2020. However, its compatibility extends back several years, making it accessible to users with older hardware or software licenses.
The supported versions include:
- CS5.5
- CS6
- CC2014
- CC2015
- CC2015.5
- CC2016
- CC2017
- CC2018
- CC2019
- CC2020 English Version
It is important to note that the action is optimized for the English version of the software. Using other language packs may result in errors due to differences in menu commands and layer naming conventions.
Step-by-Step Guide to Using the Action
Using the action is straightforward, but following the correct sequence is critical for success. Here is a simple guide to help you get started:
Step 1: Prepare Your Image
Open your photo in Photoshop. For the best results, use an image with a resolution of 2000x3000 or 3000x2000px at 72 DPI. This size ensures that the action scales correctly without pixelation.
Step 2: Create the Paint Layer
This is the most important instruction. Take a new layer and rename it “paint” in lowercase letters. The action relies on this specific name to identify where the splash should originate. If the name is incorrect (e.g., "Paint" or "splash"), the action will fail.
Step 3: Define the Splash Area
Select a brush and paint over the area of the image where you want the water splash to appear. You do not need to be perfect; rough strokes are often better as they create a more organic splash pattern. Once you have painted the area, close the "paint" layer’s eye icon to hide it, but keep the layer selected.
Step 4: Execute the Action
Open the Actions panel, locate the Water Splash Action, and click the play button. The software will automatically process the image, generating the splash based on your brush strokes.
What Is Included in the Pack?
When you purchase this professional pack, you receive more than just the action file. The comprehensive package is designed to support users of all skill levels. The file includes:
- Photoshop ATN Files: The core action file that performs the magic.
- Brushes File: Custom brushes tailored for creating the initial mask.
- 10 Different Color Options: Pre-set adjustments for quick styling.
- Help File and PDF Help File: Detailed documentation to troubleshoot issues.
- User Guide: A step-by-step manual for easy installation and use.
Additionally, the provider offers 24-hour support, ensuring that if you encounter any technical difficulties, assistance is readily available. This level of customer service is rare in digital marketplaces and adds significant value to the product.
Practical Applications in Modern Creativity
The utility of a Water Splash Photoshop Action extends beyond simple aesthetic enhancement. In advertising, these effects are used to convey freshness, energy, and purity. Beverage companies frequently use water splashes to make their products look refreshing. In fashion photography, adding dynamic elements like water can break the monotony of static poses, adding a sense of movement and drama.
For educators and students, this tool serves as an excellent introduction to layer masking and action recording. By deconstructing how the action works, learners can gain insights into advanced Photoshop techniques. It bridges the gap between basic editing and professional compositing.
Common Misunderstandings
A common assumption is that actions work like filters—one click and you are done. However, the quality of the output depends heavily on the input. If the "paint" layer is too small or placed incorrectly, the splash will look unnatural. Another misconception is that these actions only work on high-end cameras. In reality, the action works on every photo, provided the resolution is adequate. Even smartphone photos can be transformed if they meet the minimum size requirements.
Conclusion
The Water Splash Photoshop Action is a powerful tool for anyone looking to add dynamism and professionalism to their images. With its easy-to-customize features, non-destructive workflow, and broad compatibility, it removes the technical barriers to creating stunning visual effects. Whether you are enhancing a product shot or creating artistic social media content, this action provides the quality and flexibility needed to stand out. By following the simple instructions and utilizing the included resources, you can transform ordinary photos into extraordinary works of art with confidence.